Wednesday, 17 April 2013

April Guest DT Member Belinda Spencer.....

Hi all!!

I was so thrilled to be asked by Mel to be guest designer this month. I had never used moulds to create my own embellishments before and was keen to give it a go. It is a testament to Mel's fabulous moulds that they are so easy to use!! I used Martha Stewart air drying clay for all of my embellishments but next time I am going to try the resin.

My first share is a layout using the Face Silicone Mould.


I painted my face with a mixture of Dusty In Colour Bisque and Alabaster acrylic paint and then gave a spray of Tattered Angels Crochet Doily Glimmermist.


I have also used the same Face Silicone Mould on this altered Dusty Attic Journal.


Again, I painted the face with the same paints but then covered with quite a thick coat of Dusty Attic Crackle Varnish. Once it was dry and had some lovely big cracks in it I sprayed on some Dylusions Vibrant Turquoise and let the colour seep into the cracks.


Using the Mushrooms Silicone Mould and the Cherub 1 Silicone Mould, I created this canvas frame.


I painted all pieces with a variety of Dusty in Colour acrylic paints. Then, because I wanted a softer, dreamier look I watered down some Alabaster paint and whitewashed all pieces.


I created another small canvas using the Double Rose Silicone Mould.

This one is the air drying clay in all its glory!!
And finally, this tag using the Small Octopus Silicone Mould.

I have had the Stampotique spooky mermaid stamp for a while and as soon as I saw Mel's cute little octopus mould I knew it would be a match made in (underwater) heaven. I coloured this little guy with Distress Inks and Shimmerz paints.
I hope you have enjoyed seeing my creations using Mel's fabulous moulds.
Thankyou so much for inviting me to play with them Mel!!
Cheers

Friday, 12 April 2013

Some eye candy from my DT......

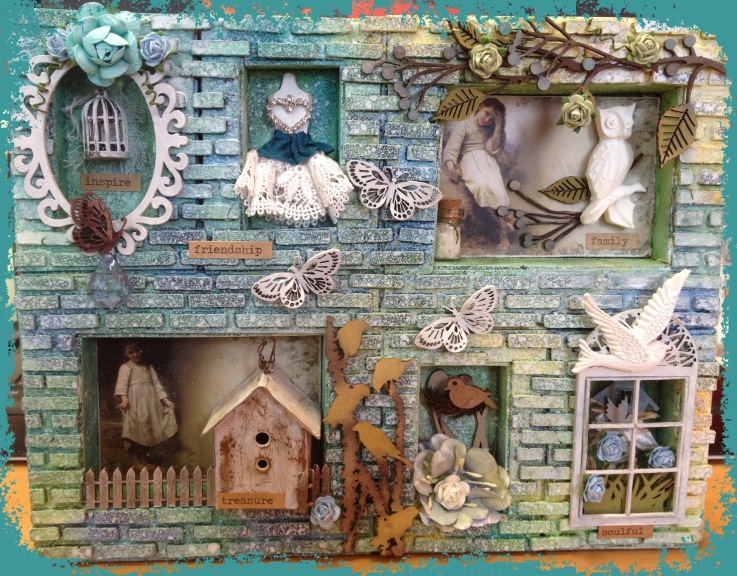
The amazing Jenny Burns has been creating up a storm again. Just created this incredible shadow box using heaps of Dusty Attic chipboard and some of the Moulds by Mel moulds.
 
I just love this. Jen has used our Owl and flying bird moulds.


 I have also had a bit of time to create, I put together a cute little shadow box also ( a bit of a theme happening here hahaha). I have used the Tall and Short Bottle moulds and two brand new release moulds which will be available soon. The rectangle frame in the centre and the awesome crown at the top.


 Thanks for stopping by to see what we have been up too. We have a very exciting Guest DT member this month. It won't be long now and I'll be able to share what this talented lady has been doing behind the scenes.
 
Mel
 
xxx


Tuesday, 19 March 2013

March Guest DT Member - Audrey Underwood

I have the pleasure of being the Guest Designer this month. Now it also happen that Mel is a friend, a beautiful friend, a creative friend with a heart of gold.
I’m not about to rave about these moulds because Mel is my friend I genuinely loved working with these. The silicon mould itself is soft and pliable and the resin, which you'll find HERE ,is the best thing I've used in moulds to date.
I'll be honest, I was both excited and hesitant when I got my package to get started. The resin scared me a bit, but I shouldn't of worried, it was all so easy to use.

Here's some shots of the pieces I made.

With Easter not far away, how could I not use the Bunny Cameo for an Easter project.

Happy Easter Frame


I love this little guy and I will use frame over and over again.

You'll find Bunny Cameo HERE

The Ornate Frame HERE


Got to Love Baby Bunny Kisses


Play Wall Hanging


Flying Bird HERE

Dancing Fairy Cameo HERE


This one was a little challenging, but I do like a challenge and it was probably my favourite of all the pieces. It was a little gift for Mel to help promote her business.


I absolutley loved playing with these moulds. I've made a supply of them so that if I need one it's ready to go.

Keep a eye on the Blog because I know Mel has some awesome new moulds being released now.

Thanks so much for having me Miss Mel, it's been a pleasure.

Happy Creating


Audrey

Monday, 4 March 2013

February Guest DT Member - Kayla Renee McAulay


I was so excited to be asked by the lovely Mel to design with some of her gorgeous pieces. She sent me some lovely moulds to work with and I was so excited to get creating. I had actually never used moulds or resin before creating these pages so it was a lot of fun to learn something new, don't be afraid!
I think the quickest lesson I learnt was to work quick with the resin, as it does set VERY quickly.
Page 1: Isn't She Lovely
I was totally inspired by song lyrics for this page. The gorgeous 'Isn't she lovely' by Stevie Wonder fitted this photo and page perfectly. I was very inspired by Wilna Fustenberg for this page. I completed an online class of hers recently which covered a lot of arty techniques and using different mediums. The background I created by covering a Crate Paper - On Trend patterned paper with gesso and tissue paper. I threw in some gorgeous white glitter for good measure. I have also chosen to use some watercolour techniques (this is something relatively new to me). The moulds I used for this project were from birds and vintage button set. I really wanted them to match the minty greens/pinks and gold I was creating on this layout so I used the EasyCast resin to make my pieces and then simply gave them a coat of gesso and misted them! I ended up dipping my paintbrush in the bottle of mist (mint julep - by studio calico) and painting it on. I really liked the effect. It was subtle but lovely.


Page 2: Pieces of Me
As you can probably tell, I was once again inspired by Wilna Fustenberg. I must have liked this colour palette recently as I have found myself using it again and again on my pages. I had these two photos sitting around on my desk for a long time, with no real intention of how to scrap them. I decided to go with a page about little pieces of me---yes I have a thing for cute shoes. Don't we all? The entire background is fabric. I have been playing around with this medium for a while now as I just love the texture. I really like to have things to touch and feel on my pages. I used the gorgeous vintage buttons and birds mould again on this page, using a similar process to above but this time instead of misting I used a gorgeous paint from Heidi Swapp. Yes it is that old and has been in my stash for years -- but it is my favourite colour! If you can see there also I used the smaller button from the mould also and painted it with a metallic gold paint. WOW! I loved this effect. I think using metallics on these pieces actually makes them look like metal. I think it would also look really good if you coated them with a layer of varnish to make them shiny,


Page 3: Brisbane Market
More fabric, stitching and that same colour mist.  I had these little Instagram photos from my recent trip to Brisbane. I went to a gorgeous city market and was so fascinated by the colours. We don't have cool markets like that where I live in cold, cold Tassie. Well we do, but not close to me! I'm a country bumpkin! The embellishments and papers on this page were from the Crate Paper On Trend line. One of my favourites by Crate Paper so far (if you can't tell). On this page I used the bigger flower mould and bird mould. You will have to see the close ups to see exactly what I did with these pieces. After letting the resin set, I coated in gesso and painted gold BUT I actually painted the gold on very thick and sprinkled with gold glitter as it was drying, this then acted as a glue for the glitter. This picture doesn't do it justice. It really stands out on my page!


Page 4: Louie
This page I hadn't intended to show you, I just had this extra piece on my desk while I was making this page for my latest kit release on my website (www.pollyscrap.com.au) I was clustering my bits on and then decided to incorporate that piece on my page. It was just raw resin, so I gave it a quick coast of gesso with the intention of painting it, however I really liked the simple gesso effect.


Sunday, 13 January 2013

January Guest DT Member - Michelle Grant.

I am excited to share these guest design pieces for Moulds by Mel. I was lucky enough to see how Mel made these resin pieces in her moulds at the Hyden Retreat. She was so gracious in waiting to show us while everyone was packing up around her! Thank you Mel! All I can say is wow, These are super easy to make and the moulds are perfect for Resin, Wax and Clay. Mel has so many gorgeous designs to work with too! You can make the perfect embellishment every time and customize the colours to suit your projects! And they work so beautifully hand in hand with Dusty Attic chipboard too! Thank you Mel for having me as your Guest Designer, I have really enjoyed creating these.

I have used the Mushroom Moulds on this canvas, they are so cute and whimsical, I have used a white dabber paint over these then inked with a soft beige chalk ink.
I have used a stencil on the background, my new favorite with modelling paste.
Dusty used on this piece is the
deVine Frame Set DA0733
Flutterbies #3 DA0766
mini Birds #3 DA0727
mini Grass Clusters DA0786
Wrought Iron Fence border DA0176

The gorgeous Green Flower is one of Mistra's from a  DSD Spellbinders Die! She is a master at these! I want her to make some more so I can buy them!

What a little treasure it was finding this hidey hole was for photographing my projects, inbetween a couple of sheds on an old rusty frame. I gave Don strict orders not to rip these weeds out or move that frame! LOL


I have made this card using Kaiser Craft papers, I love the colours in this range. I have also used Mels Lady Grace Cameo on this card. What a gorgeous cameo, I love how she turned out!


Lady Grace is a gorgeous cameo with so much charm, you can see the process I used here to transform her and give her some depth.
1. Using the Easycast Resin make your cameo using Mels Moulds, Follow the instructions on the packet.
2. I have used Dusty Attic paints and a skin toned paint to paint in Lady Grace. Use a tooth pick to paint in the fine detail on the face.
3. To give her the glossy finish and luxurious depth to the cameo, I have brushed over her with the Biscotti Perfect Pearls dry powder. It just give her a gorgeous sheen and finish.

 I have used the new Dusty Moroccan Border on this card too, I used the Biscotti Perfect Pearls to colour the chipboard mixed with a little water.


I hope you have enjoyed these Projects, and I hope you can get your hands on some Moulds By Mel, the possibilities are endless and is super easy using the resin and great Value for Money! These would be great to use on your scrapbooking, Mixed Media, Card Projects and more, Even Jewellery! Oooh now that gives me an idea!

Thanks for dropping by!!
Have a great Day!
Hugs
Michelle xxx


Wednesday, 2 January 2013

Show us your Stuff!

Moulds by Mel is sponsoring a great little blog named Show us your Stuff!
 
Its a great challenge site and you also have the oppotunity to win some prizes.
 
 
This months prompt is gorgeous. Use the image to inspire you to create something and send it in to win. xxx


Gorgeous colours and just love the little bird motif!
 
Heres the prize you can win from Moulds by Mel if you want to play along. Valued at $56.


Love Mel xxx

Thursday, 8 November 2012

Nesting box........


In October a group of like mind creative peeps just like myself make the journey out to a small rural town here in WA for Retreat. 

The Hyden retreat is held in March and October every year and this has fast become somewhat of an institution with our Perth group growing in number each time we go.

It's three long glorious days surrounded by like minded creative women who are there with one mission in mind - CREATE!!!

I have to confess my mojo is never as good as it has been the last several time I have been. Im not sure what thats about? Could be the water? the fresh country air maybe?, having my girls all around me and their mojo rubbing off?, I can't quite put my finger on it but it's a magical recipe.

Jenny, Tina and myself were there yet again. Every October retreat is a fund raising breast cancer retreat and always has a pink theme. This year we went as city cowgirls! We looked gorgeous of course! hahahaha

City Cowgirls.

As always Karen is always so supportive of both small and local businesses in the craft industry, so Moulds by Mel went to Hyden. Thank you to both Karen and all the other retreat ladies for allowing us to come and show you what we are all about.


Moulds by Mel at Hyden Retreat.


We ritually visit the Hyden op shop on saturday morning to scope out some bargains. Tina spotted this shadow box and let me have it to work my magic on. Im so glad she did, as I went to town on this little guy and completely love the final product. I wanted to go for a very earthy, darkish, forrest kinda feel and I think i might have done it. It wouldnt be mine unless there was a bit of sparkle at least so i had to had some glitter! hahahah

I think it needs some eggs? what do you think?

I'm thinking it really needs some eggs in the little pidgey holes? What do you think? Should I get to work and make some egg moulds? Wouldn't they be great.


I just went to town with the layering!

If you'd like to see the mushroom mould just click here. 

Stay tuned to the blog for some exciting things coming up very soon with Moulds by Mel. 

Mel xxx